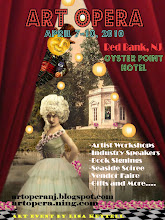
Monday, January 31, 2011

Mid Spring Nights Dream

The itinerary is Thursday Night, Friday and Saturday April 7-9, 2011
Click Here to register!
Click on the Registration link at bottom of page to see Class Workshop and Location Photos, and Banner!

The itinerary is Thursday Night, Friday and Saturday April 7-9, 2011
Teena's Workshop

Jenn's Workshop

June's Workshop


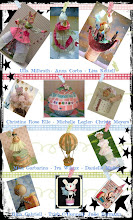
The Teachers: Teena Flanner, Jenn Docherty and June Ann, all three are published and well know artisans who each have their own books, printed in various publications and media, tv appearances and product lines.

Thursday Night is the attendee welcome party starting at 6pm:
-Meet and Greet
-Private shopping within Piddlestixs and neighboring stores:
Piddlestixs, The Mill Antiques Center, Rose Petal Porch, Lafayette Emporium, Black Pony Antiques, all hosting late night private shopping and giveaways.
-Attendee goodie bags and fairy wings, class tickets, attendee badges, etc.
-Light fare, treats and more inside Piddlestixs

Friday:
-Breakfast/coffee/tea 8:30-9am
-Class starts at 9am til 1pm
-Lunch 1-2pm
-Surprise Guest speakers 2-3pm

Friday Night Vendor Soiree: Marie Antoinette's Garden theme
Come dressed in your soiree best, lots of pearls, rhinestones and frills.
-Book signings, vendors, etc.
-6pm-8pm, public vendor soiree
-8pm-10pm, private attendee party and vendor soiree
-Location near Piddlestixs inside a 17th century old church

Saturday:
-Breakfast 8:30-9am
-Classes 9am-1pm
-Lunch 1-2pm
-Classes 2pm-6pm

Seats are limited, first come first serve basis, maximum 45 students

The new group will open on yahoo in march, for you to host swaps, meet one another and is private only to people participating in the event.

Event banner is located on my blog as are photos of Historic Lafayette and Neighboring Stores, Piddlestixs and More: Faerie Enchantment for you to use on your blogs and sites!


as well as recommended hotels and car service. Newark airport is the recommended airport!
Hotel Recommendations:
Hilton Garden Inn Rockaway, NJ 27 miles from Newark Airport, 14 miles from Event
Newton Holiday Inn Express 40 miles from Newark Airport, 2.2 miles from Event with Complimentary Local Area Shuttle, to from event and local points (recommended)
Airport Shuttle Charge from Newark airport around $40-$60

NOTE:
There are no ala carts, each student must attend all 3 classes in order to attend the thursday night and friday night parties. There are no refunds after students register.

Click on the links below to see past events and workshops:
Art Opera
Witches Tea Party
Tinsel Wonderland
Piddlestixs

Thursday, March 4, 2010

Artist Spotlight: Deb Famularo!

Scrapbooking Dolls, Artist Spotlight: Deb Famularo!

For a over 2 years I have been creating handmade doll parts for artisans of every medium from scrapbooking, paper arts and assemblage, to doll making, quilting knitting, sewing and for party ware and cupcake toppers. You name it artists have created splendid pieces using my parts which well, makes me smile.About a week ago one artist: Deb

Wednesday, December 16, 2009

Tinsel Pine Cone Dolls!

Pinecone Carnival Soiree! 2
Materials:
Art Glitter: Designer Dries Clear Adhesive
Art Glitter: Vintage Fine Glass Glitter #611 Antique Silver
Art Glitter: Vintage Fine Glass Glitter #607 Cobalt Blue
Art Glitter: Vintage Fine Glass Glitter #608 Red Damask
Art Glitter: Vintage Fine Glass Glitter #613 Diamond Dust
Small-medium sized pinecones
Small Styrofoam balls
Crepe paper streamers: aqua, light green and pink
Tinsel garland: old fashioned silver
Tinsel chenille stems: silver
Lettered wording
Acrylic paints: Flesh color
Gel pens: black and red
Hot glue and hot glue sticks
Glue Stick
Scissors
Other: paint brush, cup, water, shiny card stock, millinery flowers, tiny pompoms, sequins, tiny pearl strands

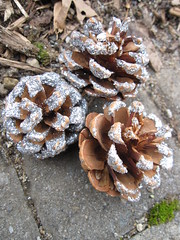
Glittered Pine Cones!
Directions for Glittered Tinsel Pine Cones:
1. Apply designer dries clear adhesive to the pinecone, then with a paint brush paint the adhesive onto all the edges.
2. Next sprinkle some #611 antique silver glass glitter or # 613 diamond dust onto the pinecone, let dry, shake off excess.
Pinecone Carnival Soiree! 8
Pinecone Carnival Soiree! 5
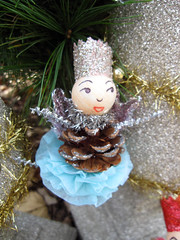
Directions for Pinecone Tinsel Ballerinas:
1. Apply designer dries clear adhesive to the pinecone. Then with a paintbrush, paint the adhesive onto all the edges.
2. Next sprinkle some #611 antique silver glass glitter or # 613 diamond dust onto the pinecone, let dry, shake off excess and set aside.

3. Paint Styrofoam balls w/flesh paint, let dry. Then draw a face onto them using gel pens, glue to top of pinecone.
4. Cut 2 pieces of tinsel chenille stem measuring 4 inches each. Wrap one piece around pinecone, hot glue in place. Arch the next tinsel chenille stem and hot glue to the bottom of the pinecone.
5.Begin embellishing your ballerinas with crepe paper, party hats, crowns, tinsel garland and tiny pompoms. For the hats and crowns, use cardstock, coated in either #607 cobalt blue or #608 red damask glass glitter.
Pinecone Carnival Soiree! 7
Tips:
-Try glittering your pinecones with other glass glitter colors
-Make a glittered pinecone wreath using Styrofoam wreath, fill in with pinecones, securing in place with hot glue, coat pinecones with glitter, fill in vacant spots with velvet leaves or floral berries coated in glitter.
-Hang glittered pinecones from a window using pretty ribbons, place battery candle on windowsill to see the glittered pinecones glow.

Visit the Art Glitter Blog for the original post by me:
http://artglitterblog.blogspot.com/2009/11/pine-cone-tinsel-ballerinas-by-lisa.html

Tuesday, December 15, 2009

Glittered Toy Blocks, Storybook Toy Dolls and Bottle Brush Trees

Original post was on the Art Glitter Blog: http://artglitterblog.blogspot.com/2009/11/glittered-toy-blocks-storybook-toy.html

Confectionary Toy Block Friends!How many times have you walked into a store, saw colorful holiday trees for every occasion and in every color, some are pink, aqua and tinsel silver, others are extra enhanced with chunks of mica flakes, snow and glass glitter. Well I have found many ways to change the look of plain green trees from bottle brush to floral and wire Christmas trees, all you need is a tree, some bleach and Art Glitter.My Silver Bella Display! 5Materials:

Art Glitter-Art Glitter: Designer Dries Clear Adhesive-Art Glitter: Variety of Ultrafine Transparent Glitter
-Art Glitter: Variety of Ultrafine Opaque Glitter-Art Glitter: Variety of Fine Glass Glitters (For various effects)Paints/DyesAcrylic paints: variety of bright, pastel and metallic colorsFlocking: variety of colorsOtherHand sculpted clay figurine or store bought plastic or paper figurineSmall-medium sized bleached bottle brush trees (refer to tree bleaching and dye instructions)Container of waterTools: paintbrush, scissors, hot glue and hot glue sticksOther: crepe paper, paper, tinsel garland, tinsel chenille stems, small bulbs, millinery flowers, tiny pompoms, sequins, tiny pearl strands, flocking
Glittered Toy Blocks!
Directions for Glittering Toy Blocks
1. Coat the lettered rim part of a toy block with Dries Clear Adhesive.
2. Sprinkle wet adhesive with glitter of choice, let dry then slightly tap off excess.Nora and the Bubble Gum Soiree
Directions for Toy Block Dolls
1. Attach figurine of choice to toy wooden block using hot glue, let set a minute.
2. Begin decorating your figurine w/ flocking, texture glitter or glitter of choice. Adhere these textures using Art Glitter Dries Clear adhesive, let dry and tap off the excess.
3. Decorate your toy top with a small bottle brush glittered tree, glittered crown, glittered hat or mini bell, berries, millinery, crepe paper and tinsel.
4. Coat the toy block base using a variety of Art Glitter products.Fannie FerrystoneTips:-Use basic wooden square shapes, instead of toy blocks and coat w/glitter.-Use cupcake/sugar craft figurines and picks instead of sculpted ones.-Hot glue toy blocks to a floral wreath, add a holiday word banner and coat the blocks in various coordinating glitter colors.-Spell out your favorite holiday word using toy blocks and glitter.Icy Cherrycone
Glittering and Bleaching TreesMaterials:
Art GlitterArt Glitter: Designer Dries Clear AdhesiveArt Glitter: Designer Dries White AdhesiveArt Glitter: Faux SnowArt Glitter: Vintage Fine Glass Glitter #611 Antique SilverArt Glitter: Vintage Fine Glass Glitter #613 Diamond DustArt Glitter: Variety of Fine Glass Glitters (For various effects)Paints/DyesAcrylic paints: variety of bright, pastel and metallic colorsInk, KoolaidSpray paint base coatSpray paint or hair color spray paint: variety of bright, pastel and metallic colorsBleachOtherSmall-large sized trees (bottle brush or holiday Christmas trees)Large plastic storage container (for big trees)Small plastic or foil pan (for small-medium trees-bottle brush)Painters ventilation mask(for spray paint)NewspaperRecycled box (for spray paint)Container of waterTools: paintbrush, old salad tongs, scissors, hot glue and hot glue sticksOther: tinsel garland, tinsel chenille stems, small bulbs, millinery flowers, tiny pompoms, sequins, tiny pearl strands, flocking
glittered bleached bottle brush
Directions for Bleached and Glittered Bottle Brush Trees:
Use in ventilated area, I recommend outside or in garage
1. Place bottlebrush trees in a large pan, cover with bleach, turning trees with tongs every 5-10 minutes or so until completely bleached and no green color remains. Smaller trees will bleach faster, larger ones longer.
2. Let dry for 24 hours on a stack of newspapers or disposable plastic plate.
3. Once trees have dried, begin painting or dying them. To spray paint color on them, place in a recycled box and spray paint with the color or your choice. To dye them follow the drink mix recipe below, once dyed, let dry.
4. Once your trees have been colored and dried, apply designer dries clear adhesive to them. With a paintbrush paint the adhesive onto all the edges.
5. Next sprinkle some #611 Antique Silver Glass Glitter or # 613 Diamond Dust onto the pinecone, let dry, shake off excess. For snowy trees apply the Dries White adhesive followed by Faux Snow.


Directions for Bleached and Glittered Large Christmas Trees:

Use in well ventilated area, I recommend outside your house

1. Place medium to large trees in a recycled box or on a bed of newspapers, place tree onto this area, put on ventilation mask, and spray paint with the spray paint base coat, let dry 10 minutes, repeat.

2. Now spray paint with color of choice, the more coats you spray the brighter your trees. Always follow spray paint manufacturer instructions.

3. Once trees have been spray-painted and dried, apply Designer Dries Clear adhesive to them. With a paintbrush paint the adhesive onto all the edges.

4. Next sprinkle some #611 Antique Silver Glass Glitter or # 613 Diamond Dust onto the pinecone, let dry, shake off excess. For snowy trees apply the Dries White adhesive followed by Faux Snow.

5. Decorate with tinsel, tinsel garland, bulbs, millinery and glittered ornaments.

Koolaid Drink Mix Dye Recipe

In medium sized bowl mix the Koolaid powder with 1/4 to 1/3 cup white vinegar. For brighter colors use less water and more powder. For softer colors use more water. If Koolaid is not available replace with food coloring or inks.Pour Koolaid dye over your trees and turn w/tong until completely dyed, repeat until desired color is achieved, let set and dry 24 hours.Tips:-Try glittering your trees with a variety of glass glitter colors-Paint stripes onto your bottlebrush trees.-Turn the trees into dolls using clay or foam heads, and other embellishments-Glitter Christmas tree stems each with a different color or with two favorite colors, how about pink glass glitter on one stem and silver glass glitter on another stem.

Saturday, December 12, 2009

The Cupcake Stixs From Guest Designers!

Hello All,

We are now in the swing of things with Moonfaires World Designers and The Art-Stixs Magazine. Many of you know I create all types of works using my doll parts, one thing I do is create Charlotte Head Cupcake Stixs and Vintage Styrofoam Cupcake Stixs. I gave the cupcake stix kit to the goodie bags of the bellas at Silver Bella.


Here are what some Bella's did w/the ones they either received or bought from me. Other designers are customers from Etsy who shared with me their beautiful works!


In these photos Nina Little created Cupcake Stix Dollies w/her kit from Silver Bella, aren't they wonderful?


Miss Mendy purchased my Charlotte Cupcake Stixs and look what she did with them! DOn't you just want those cupcakes?


Cheryl Worthy aka Send A Celebration used the cupcake stixs in a new way, as the embellishment to top off her party hat. Cheryl sells a wonderful line of celebration works at her
Here is the listing for the wonderful hat which fits adults and children:


All images are copyrighted by the artist, please contact them if you have any photo questions on their images, artwork or to purchase!

Wednesday, November 25, 2009

Moonfaires World Guest Designers!

Hello All,
This is going to be the new location for the: "MoonFaires World Guest Designers",You will be able to read new cutting edge projects using our new extended line of doll parts and vintage products such as spun cotton doll heads, styrofoam heads, bisque parts, foam parts, lightweights, flat backs, rounded, doll head beads, and other doll oddities.

I will periodically have links to other creative sites who showcase or use our doll parts, have projects of ours on their sites, where we also guest design, do our works, work shops, events and more.

We love working with other companies using their glitters, Dresden's, vintage oddities, inks, wax, papers and more. I believe art supplies are always complimented by other art supplies, it joins us all together.

The choosen guest designers are exceptional in their fields and will bring you a variety of styles and ideas for each of you to experiment with.

Starting in December our designers will begin their journey into Moonfaires World using our doll parts and accessories, stay tuned for the magic!

Friday, February 20, 2009

Vintage Beeswax Doll

Materials
-Beeswax, Beeswax Pellets (Suze Weinberg)
-Melting Pot
-3-D Doll molds which can sustain hot wax
-Foil cookie sheet
-1/2 yard Muslim Fabric
-Scrap fabrics: Crinilon, Tulle, Lace, Tafeta, Velvet, etc.
-Batting
-Sewing Machine
-Needle and thread


Directions
1. Pour beeswax into the melting pot and heat according to melting pot directions.
2. Place the mold of choice onto the cookie sheet to protect working surface.
3. Now pour the hot beeswax into the mold, let set/harden, pop out for a doll head, repear for the doll arms and legs, again using doll molds.
4. Pierce holes into the pieces, set aside.
5. Measure out 2 pieces of muslin to 8 inches long by 4 inches wide. Lay pieces on the rectangle shape, trace the ends onto the muslim with pencil, this will mark the place on the fabric where you will not sew.
6. Stitch the pieces together, remembering to leave the marked lines open. turn right side out, through one of the open holes.
7. Now insert the beeswax doll parts into their open slots, sew through their pierced holes and into the fabric with needle and thread, until secure.
8. Decorate with a homemade dress, paint, embellishments and more.

Project Options:
-Just make beeswax doll parts for your projects.
-Use a old cooking pot with thermometer to melt your beeswax (keep this pot now strickly for art projects)
-Make larger or smaller dolls and adjust your cloth body accordingly.
-Make Beeswax embellishments for scrapbooks and altered project glue in place with
E-6000 or clear caulk.
-Always use caution when working with hot, sharp or strong glue materials, remember good ventilation with strong chemicals and glues.