


What's better then a project consisting of Dresden trim, antique silver glitter, tinsel and vintage boullion, uhm....nothing, well maybe a 5 scoop hot fudge and toffee sundae with extra whipped cream and cherries, that could really top this, LOL!
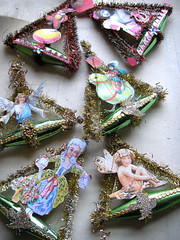
Okay, I have been re-visiting my inner vintage and for the past year I have been experimenting with old projects from Dennison books, old crepe paper books, crafts and design books, vintage christmas catalogs and more, looking for ways to simplify the projects I saw, and giving them a twist, some pastel colors, mixed with gold or over the top distressed. As a result I have re-discovered the art of our past and learned to make over 28 vintage items from crepe paper dolls made 5 different ways, tiny styrophom angels, cone dolls, Victorian Ornaments, Paper Mache goodies, Charlotte Dolls, Carnival Dolls and more.
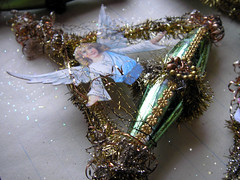
The following project was created from a turn of the century ornament I have, it acted as the muse for this project made from Dresden Trim, tinsel, boullion, images and a small oval Christmas Ornament, along with some supplies.
Here are the instructions, which will be followed by a quick demo!
Dresden Trim Ornament
Materials
-Small oval shaped Christmas Ornament (about 2 to 3 inches long)
-Two thick Chenille Stems in Metallic Gold
-One strand of boullion
-A strip of thin Dresden trim
-Dresden trim small medallion shape, or tiny gold charm
-Vintage image of choice
-Small piece of scrap book paper
-Antique Silver Glitter (Martha Stewart)
-Hot glue, glue gun, regular glue stick
-Scissors
Directions
1. Wrap a piece of chenille stem around the center of the Christmas ornament, only once, with hot glue, cut the left over stem to 4 inches, repeat on the left and right side ends of the bulb. (Refer to project sample and demo).
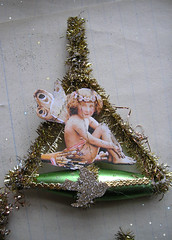
2. Twist the three ends to form a triangle shape.
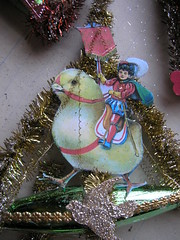
3. Choose a vintage image that is sized to fit the center of the ornament, between the bulb base and the chenille stem top. Layer your image onto sturdy card stock, with glue stick, then cut out and hot glue to center of the bulb.
4. Hot glue the thin dresden trim down, alond the front center of the bulb.
5. Wrap the ornament 4 times, with un-raveled boullion, hot glue end in place.
6. Glue on some silver glitter
7. Finish embellishing with Dresden medallions, extra trim or other vintage oddities.
Tips/Hints:
1. Use ditressed tinsel, refer to project below this post.
2. Use red or pink chenille stems for Valentines Day or Easter.
3. If you don't have boullion, use tin DMC metallic gold thread, unravel a bit.
4. Try using a round Christmas Bulb or painted styrophom ball instead of the oval ornament.
5. Use images of family members in place of Victorian Clip art or collage images.
6. Use Small paper craft punches, cover them in silver or gold vintage glass glitter or Martha's Antique silver glitter, in place of the Dresden trim medallion.

3 comments:
I really love the stuff you do. I find it appealing in a big way. I have been meaning to try some dresden ornaments myself, Thank you for providing directions. I will be visiting often.
So glad, I'd love to see what yours look like when they are done!
Much Magic and Joy To You!
Lis!
This video was so soothing and enjoyable to watch. Thank you.
I am going to attach it to my blog and I am writing down your site and giving it out next month to our art group called New England Artists in Massachusetts.
Post a Comment